Monday, February 28, 2011

Scones - not just for the Brits!

Looking for an easy, whip-it-up breakfast, brunch, or snack idea? Look no further than my FAVORITE dried cherry scones! They are simple to make and simply de-lish!!!!!
The scone process is easier than you think. Watch.....
Mix the dry ingredients together.
Cut in the butter. I do this with two knives, slicing back and forth.

Add the wet ingredients.
Stir in the dried fruit or nuts.

Shape into a ball on a floured surface, or on a Silpat.
Flatten the dough into a disc and cut into wedges.
Place the wedges on a cookie sheet.
Brush with egg whites, cinnamon-sugar, or whatever the recipe says to put on top.
Bake and Voila! Fresh and easy~
I even freeze half of them on a cookie sheet before baking
and save them in a ziplock for another day.
Here's the recipe!

Cherry Scones

  • ¾ cup dried sweet cherries
  • 1 cup boiling water
  • 3 cups all purpose flour (I often substitute half whole wheat flour, but if you do this, add a bit more liquid.
  • 3 tablespoons sugar
  • 1 tablespoon baking powder
  • ½ teaspoon salt
  • ½ teaspoon cream of tartar
  • ½ cup butter, softened
  • 1 egg, separated
  • ½ cup sour cream
  • ¾ cup half and half
Soak cherries in boiling water for 10 minutes. Drain and set aside.
Combine flour, sugar, baking powder, salt and cream of tartar in a large bowl.
Cut in butter with a pastry blender or knife.
Combine egg yolk, sour cream, half and half, and almond extract.
Add to flour mixture and stir until soft dough forms.
Turn out dough onto a well-floured surface and knead gently 6-8 times.
Knead in cherries until evenly distributed.
Divide dough in half and shape into two balls.
Put each ball into a 6-inch circle.
Cut each into 6 wedges with a sharp knife.
Place scones on a lightly greased baking sheet.
Beat egg white until foamy.
Brush the top of the scones with egg white and sprinkle with sugar.
Bake at 400 degrees for 15-20 minutes.
Serves 12

Monday, February 14, 2011

Death by Tiramisu

If you've been looking for a TO-DIE-FOR-HEAVEN-ON-A-PLATE dessert for Valentine's Day, you've come to the right place! Behold (drumroll please).......

TIRAMISU!!
There is an Italian chef in our town who I like to take cooking classes from whenever I can. He is simply fabulous and his restaurant is, in my opinion, hands down the best around. This version of tiramisu is my own adaptation of his original recipe. My husband actually goes down to Angelo's restaurant and picks up this lusciousness every year on my birthday (isn't that so sweet)? They expect him now-- same time same place -- I love it!

Death by Tiramisu

Coffee mixture

2 cups Strong coffee

1 1/2 tbsp. instant espresso powder

1/4 cup Brandy or Rum

¼ cup sugar

Stir coffee, espresso, and alcohol in a dish until espresso dissolves. Set aside.

Zablione Mixture

15 egg yolks

1 1/4 cups sugar

3/4 cup Marsala or Rum

1/4 tsp. table salt

Beat eggs at low speed until just combined. Place the mixture over a pot of boiling water, making sure that the bottom of the bowl doesn't touch the water (you don't want to scramble the eggs). Whip the mixture until thickened. Do not let the mixture "sit" in the bowl over the steam. The eggs will cook if not stirred continuously. Cover with plastic and set aside to cool down in the fridge.

Whipped Cream Mascarpone Mixture

6 cups of whipping cream

4 tbsp. vanilla

1 1/2-2 lb. mascarpone cheese

Pour the cold cream into a bowl. Start beating the cream slowly. If the cream is whipped too quickly, it will deflate. After 1-2 min., increase the speed to medium high until soft peaks form. Add the vanilla and mix until just combined. Turn down to low and add the mascarpone in increments.

When zablione mixture is cool, place whipped cream mixture in a big bowl and carefully add ¾ cup of the zablione at a time. Fold in from the outside gently.

Final Ingredients

2 Ladyfinger Packages

(buy the hard ones --do not buy the soft kind sometimes found in bakeries.

I like the kind that are sugar coated on one side).

chocolate chips or chocolate, chopped finely in a processor

cocoa powder

To Assemble:

In a shallow dish, dip the flat edge of the ladyfinger into the coffee mixture for 1 second, flipping quickly to coat the other side, and immediately remove and place in the bottom of a 9x13 dish. DO NOT SUBMERGE THE LADYFINGER. They will fall apart if they are dipped completely into the liquid, even if you do it quickly. Repeat until the bottom of the dish is covered. Spread 1/2 of the zablione cream mixture over the top. Top this layer with ground chocolate and cocoa powder; repeat the process again with the lady fingers going the opposite direction as the bottom layer, followed by the zablione, and topped with the chocolate and cocoa powder. Refrigerate and let set until the next day.


Thursday, February 10, 2011

How to Roast Chicken for any Recipe

I try to protein-pack my family's diet, so I often add chicken to whatever I'm making. This is the easiest way I've found to roast chicken quickly and easily. It is also very moist and tasty. My kids love it just as it is right out of the oven!
Before I start making dinner, or earlier in the day, I place frozen chicken in a 8x13. Pre-heat the oven to 425 degrees on the roasting feature if you have it. If not, just regular 425 will do!
I then drizzle the top of the chicken with olive oil.
I then sprinkle the chicken liberally with kosher salt (the only salt I use), and freshly ground pepper.Cover the chicken with foil and put it in the oven for 40-50 min.
Check the chicken to see if the middle is done and the juices run clear (not pink). Cool and slice or shred.

Saturday, February 5, 2011

Homemade Hummus -- You'll Never Buy Store Bought Again!


I do not know why people are so amazed when I pull out homemade hummus. It is the easiest thing to make, and once you try it, you'll never go back to store-bought again! There is a huge difference in taste and quality -- Try it! You won't be sorry --
Just a few ingredients is all you need.
Don't forget to rinse the beans!
Puree in a food processor or blender.
Serve with veggies or pita chips.

Recipe:
1 15oz. can chick peas
1 garlic clove
3/4 tsp. salt
pinch of cayenne pepper
3 1/4 tbsp. fresh lemon juice
1/4 c. tahini
1/4 c. olive oil
3/4 c. water

Process all ingredients in a food processor or blender. Refrigerate at least 30 min. to let the flavors meld.

Friday, January 28, 2011

Apricot-Almond Biscotti

I've made several biscotti recipes, but this one is hands-down my favorite! I sometimes dip them in white chocolate when I'm done, sometimes I don't. They are delicious either way!
Start out by mixing the dry ingredients in a bowl, and the wet ingredients in a food processor.

Make a well in the flour, and add the wet ingredients.

Mix thoroughly, but don't go crazy and overmix.
Shape into loaves and refrigerate.
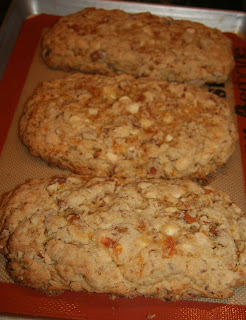
Bake. I like using the non-stick baking pads called Silpats, though you can also butter and flour your baking sheets and that tried and true method works also.
After baking the loaves, cut horizontally and lay them on their sides back on the baking sheets.

Flip them and bake again. This is what biscotti actually means: "twice baked."
Plan a coffee/biscotti morning with your friends, and prepare to be tackled for the rest of them before they all leave!

  • 2 ¼ c. all purpose flour
  • 1 ½ c. sugar
  • ½ c. unslated butter, chillded, cut into pieces
  • 2 ½ tsp. baking powder
  • 1 tsp. salt
  • 1 tsp. ginger, ground
  • c. white chocolate chips
  • 1 ⅔ c. blanched, slivered almonds, toasted
  • 2 eggs
  • ¼ + 1 tbsp. cup apricot brandy
  • 2 tbsp. almond extract
  • 1 ½ c. dried apricots, diced

  • Combine flour, sugar, butter baking powder, salt and ginger in a food processor and process until a fine meal forms -- about 30 sec. Add chips and process until finely chopped, about 30 sec. Add almonds and chop coarsely, about 15 sec.

    Beat eggs, brandy, and extract in a large bowl until blended. Add flour mixture and apricots and stir until a moist dough forms.

    Line a cookie sheet with foil. Butter and flour foil (or use Silpat). Divide dough into thirds and place on the cookie sheet in three 12-inch strips. Moisten fingers and shape dough into 2 inch wide biscotti shaped logs. REFRIGERATE 30 MIN.

    Bake at 350 degrees for 35 min. Remove logs from the oven and cool. Cut each log into 3/4 in. slices and place each slice on its side on the baking sheet. Bake at 300 degrees for 12 min. Turn biscotti and bake for an additional 12 min.

    Makes 4 dozen.

Tuesday, January 25, 2011

Jury duty turned cooking class....

Really. It was my first year of teaching high school in Beaverton, OR and low and behold, I was “summoned” to serve on jury duty. When you are called to the jury in Portland, you have to sit there all day, whether you are chosen for a case or not! I was newly married and had no idea how to cook. It was the perfect opportunity. I bought a copy of “The New Basics”cookbook, which is as big as a Bible, and I read it cover to cover. These two ladies schooled me in everything from pureeing soups to identifying beef cuts to whipping up a chocolate mousse. This new world fascinated me. How could there be so much information aboutCOOKING?

I call this experience my domestic “awakening.” I opened that book and have never looked back. Since then, I have been a diligent student of cooking, crafts, gardening, and decorating. These are some of my “passions,” and I’m happy to say that my family mostly benefits from them.

It can sometimes feel like there is no time to explore new areas of interest. We barely keep up on the day to day (believe me, I can relate to this)! However, growth enriches our lives and keeps us energized. My new area of interest is photography. I've been talking for a while about learning more about it. It's time for a plan! Is there an area you would like to explore but haven’t had the time? or is there an area you would like to explore in greater depth?

Create an action plan below:

1. Identify on a piece of paper 1-3 areas you'd like to explore.

2. Find the "leading" books on these topics and order a couple. Websites like Amazon are wonderful for buying used books, and the reviews are helpful when making your selections.

3. Set aside time to learn about this new area. It could be an hour a week on a Saturday, or once a month. You may even luck out and get called to jury duty! If you do, you'll be ready! :)

4. Get some accountability! Find a friend who wants to explore the same area, or who will ask you about your progress.


TO-GO Burritos

  • My sister swears by homemade burritos, and I finally wised up and got on the band-wagon! These are super handy to have around. I make a bunch of them, freeze, and then place in a ziplock. My husband and kids pull them out for lunches, work, or for a heavy snack in between games.

  • 2 lb ground turkey
  • 2-3 c. pinto beans
  • 3 c. shredded cheddar cheese
  • Refried Beans
  • ¼ c. chicken broth
  • ½ tsp. salt
  • 1 onion
  • 1 jalepeno
  • ½ tsp. cumin
  • 2 cloves garlic
  • 2 tbsp. cilantro leaves
  • 2 tsp. lime juice

Step 1: Soak the beans overnight, and then cook in the crock pot or on the stove for 2-6 hours until soft (or just get them from the can). When using a crock pot, I cook them in chicken broth with a couple of garlic cloves thrown in. After the beans are soft, puree 3/4 of the beans in a food processor with the broth, ground cumin, salt, onion, garlic, cilantro, and lime juice (and jalepeno if you like it spicy). Transfer to a bowl and add the rest of the beans to give it some texture.

Step 2: Cook the ground turkey and set aside.

Step 3: Shred the cheese in a food processor. I do not like the pre-shredded cheese at all. The food companies have to put emulsifiers in the pre-shredded to keep it separated and it changes the composition of the cheese. I HIGHLY encourage you to shred your own! It makes a big difference.

Step 4: Cook the tortillas as directed, or heat pre-made tortillas in the oven.

Step 5: Assemble the tortillas. Place the filling in the middle and wrap. Place each in a section of plastic wrap and place on a baking sheet. Freeze until firm. Transfer to a ziplock bag.

Step 6: These go straight from the bag to the microwave. Place them on high for 3 minutes and they are ready! You could also wrap them in foil (remove the plastic wrap) and heat in the oven.